Getting your website to rank in Google can quickly become a long-drawn-out process. If you are someone who has a newer website then you know what I mean. It feels like you are constantly fighting against the search engine just to give your webpage a little exposure.
There are many Search Engine Optimization(SEO) posts out there that will give you an “in-depth guide” to improve your site’s ranking. This isn’t one of those posts.
Instead, this a quick, actionable SEO guide that will give you a snapshot of your website performance and ways to improve it.
If you want to read one of those blogs that provide a full SEO analysis, I suggest you do so. But only do it after following these 8 simple steps; as I’m going to show you how to improve your website ranking without the need for expensive tools.
After we are done here, you’ll be able to determine your website’s health, hone in on how your competitors are doing, and discover what needs to be done to improve your SEO.
How to Improve Website Ranking In 8 Simple Steps
Let’s first take a look at the 8 steps we will be covering in this post. I like to call them my 8 “dummy-proof steps.” This has more to do with me than it does with you because, if I can implement these steps, then anyone can:
Step 1: Find your domain authority.
Step 2: Determine your site’s load time.
Step 3: Check for a sitemap.
Step 4: Check for robots.txt.
Step 5: Check for meta content.
Step 6: Check for H-tags.
Step 7: Check for onsite content.
Step 8: Test keywords.
Step 1: Find your domain authority
Did you know that Google considers over 200 factors when it determines how sites are ranked on the search engine results page(SERP)? Unfortunately, this means that even your best on-page SEO efforts won’t easily get you ranked.
Although this can be a bummer, you can still optimize your site for one of the search engine’s most important ranking factors — domain authority.
What’s Domain Authority?
Developed by the SEO software company Moz, domain authority(DA) is a search engine ranking score that indicates your website’s ability to rank on search engine results pages.
Domain authority ranges from a score of 1 to 100. Obviously, the higher your score, the more authoritative your site is considered. Often, sites with a higher domain authority get better search results.
If your website is new, however, you’ll likely have low domain authority. Don’t throw in the towel just yet, though. With more time, SEO implementation, and authoritative backlinks, your domain authority will increase.
To check your domain authority, all you have to do is go to Moz’s Open Site Explorer, type in your site’s URL, and click “search.”
Your score will most likely not be what you were expecting. To help you make sense of your score, here is a chart that will help you understand how your site fares from a DA perspective.
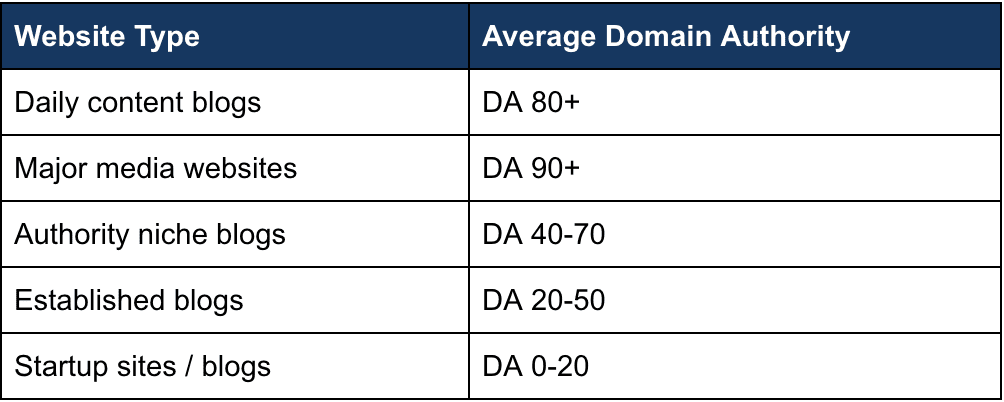
Once again, don’t freak out over your DA if your site is new. Yes, it is important to your rank but use it to get insight into whether you need to do more SEO work.
Step 2: Determine your site load time
You’ve heard it before (and if you haven’t, you are hearing it now), site speed is everything when it comes to SEO.
It’s true. If you hope to boost your site’s rank, you need to optimize it for speed. If you aren’t sure how to do that, don’t worry. I’ll show you a few tricks that should immediately help your site speed.
First, you should head to Pingdom to test your site’s load speed. Once there, type in your URL, and click “test now.”
In a matter of seconds, Pingdom analyzes your site’s load time and gives you an instant performance report. In order to understand the score assigned to your website, check out this chart as well.
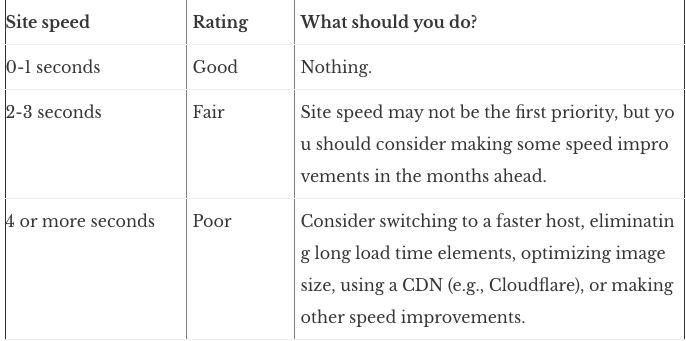
If your site speed is from 0-1 seconds, congratulations you are performing better than most sites. However, if your site happens to be a bit slower, try implementing these few tips and see whether it makes a difference:
1.Enable compression
The smaller your files, the faster your pages will load. Compressing files is one of the easiest ways to reduce load times, and today, enabling compression with Gzip is considered standard practice.
If you want to compress your files I recommend you watch this video that walks you through the steps.
2. Reduce image sizes
If you are someone like me who loves to use images in your content, then you probably also suffer from slower site speeds. Because images are often very large, they can play a major role in your load speed.
Removing them altogether isn’t an option so you’ll have to reduce their size without sacrificing their look.
One of the easiest ways to reduce image file sizes is by cropping them to the correct size. For example, if you want an image to appear as 570px wide, resize the image to that width.
If you don’t want to crop your carefully picked images, you can also use plugins like WP Smush (assuming you are on WordPress) to compress your image files.
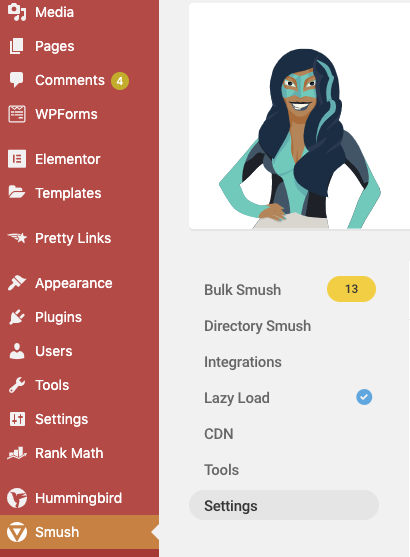
This is a matter of downloading the WP Smush plugin and selecting “bulk smush” in the menu.
You can also use this plugin to automatically resize all future files you upload. Set a maximum width and height, and any images that exceed them will be “smushed.”
3. Enable browser caching
Whenever someone visits a website, they have to download page elements (HTML documents, stylesheets, javascript files, and images) before being able to use your page.
Once the page has been loaded, the different elements get stored in the user’s fast, accessible, memory. This is known as a cache.
A cache is important because it reduces the number of components that need to be downloaded for subsequent visits.
Simply put, it can shave off a significant amount of time for your returning visitors and provide a better user experience.
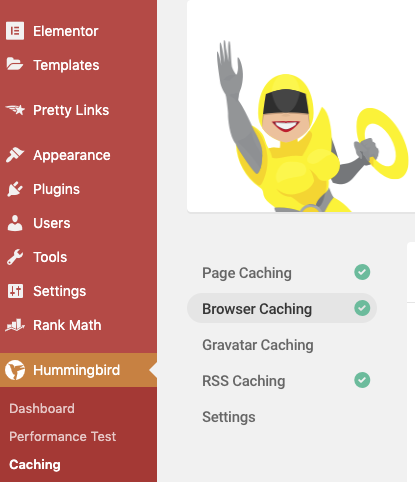
I use the WordPress Hummingbird plugin to seamlessly handle my website caching. It offers a full caching suite to include full-page, browser, and Gravatar cache options.
4. Reduce the number of plugins you use on your site
This might sound pretty hypocritical of me. Here I am telling you to download plugins and yet telling you to reduce the number you have.
The truth is, plugins can do a lot to improve your website. They add custom functionality, clean up your code, improve user experience, and more. Plus, they’re extremely easy to install.
However, because of all this, it’s easy to get carried away with adding and installing plugins, without considering the amount of storage they are taking up.
Having too many plugins installed can become counterproductive at a certain point because they can slow down your site and create technical difficulties.
When choosing plugins, only keep those that are essential to your website’s function. Those that you no longer use, delete. This will go a long way towards improving your site’s overall speed.
Step 3: Check for a sitemap
Sitemaps are an important aspect of your technical SEO and therefore your site rank.
A sitemap is a blueprint of your website that helps search engines find, crawl and index all of your website’s content.
Although Google claims its web crawlers have become very efficient at finding and navigating websites, a sitemap is still an extra precaution you should take in your SEO efforts. Not to mention, sitemaps are a sign of an organized and easily indexable site, which is always good for SEO and site ranking.
If you want to see whether you have a sitemap or not, go into the Google query, enter the URL of your website, followed by a space, then “sitemap.xml.”
If the search still doesn’t return any results try typing the full version of your URL with “www” included. ( www.example.com sitemap.xml)
At that point, if you still don’t see a sitemap, there is a chance there isn’t one. In that case, you’ll need to create a sitemap, which believe it or not is an easy process.
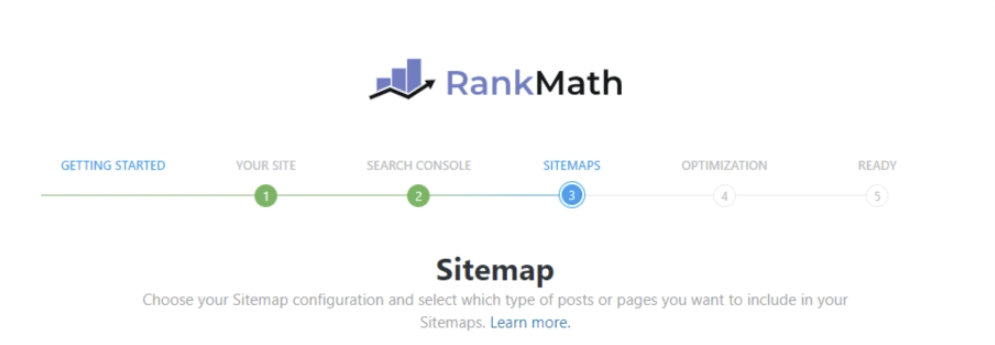
When creating my sitemap, I did so through my SEO plugin, Rankmath. During the setup process, you will be directed to create your sitemap and after the install, it will become easily accessible.
The last thing you need to do after creating your sitemap is to make sure it is added to Google Search Console. This makes sure Google has the blueprint of your website so it knows how to properly crawl and index it. Follow along with the video below; it shows you how to easily submit your sitemap to Google.
Step 4: Check the robots.txt
In addition to having a sitemap, you also want to make sure your site has a robots.txt file with no major disallows.
I know this sounds technical but trust me it’s simple. A robots.txt file merely tells the search engines how to crawl your website. It does this by using “disallow” and “allow” statements that direct the search engines to where they can and can’t crawl on your site.
To see your site’s robots.txt, type in [yourdomain]/robots.txt in your web browser. The results should look something like this.

As you can see, I have a robots.txt file that disallows the web crawlers from indexing the “wp-admin” portion of my website. Because this section of my site does nothing for my SEO and ranking, I don’t need crawlers on it.
Make sure on your site that the robots.txt is there and that nothing major is disallowed. If your site lacks the robots.txt or disallows content crawling on major areas of it, you likely have an SEO problem.
Step 5: Check for meta content
Meta tags provide information about the webpage in the HTML of the document. This information is called “metadata” and while it is not displayed on the page itself, it can be read by search engines and web crawlers.
Google uses metadata from meta tags to understand additional information about a webpage. They can use this information for ranking purposes, to display snippets in search results or sometimes they can ignore the met tags altogether.
However, there are two meta tags you want to make sure you have in place. Check your website for the following:
<Title> Tag
A title tag specifies the title of a web page and is displayed on SERPs as the clickable headline for a given result. These tags are important for usability, SEO, and social sharing. To see how your site appears on the Google result’s page, first go to your site’s homepage.
View the source code. If you use a Mac, you should be able to use the “tools” or “view” menu to view the source.
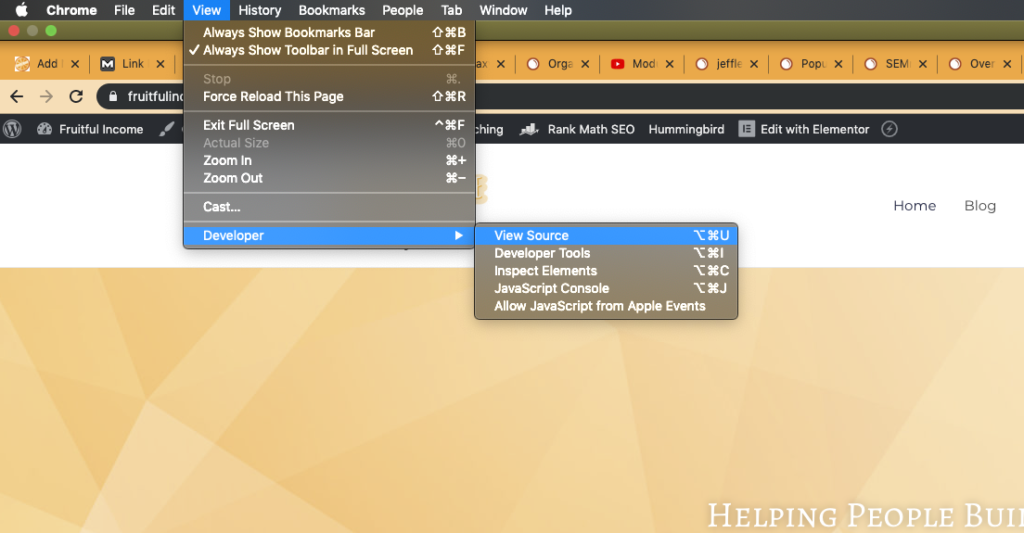
Once you bring up your source code you’ll want to search it for <title> tag. You can do this easily by pressing CTRL + F, then typing <title>. The page title, if you have one, will be displayed.

<Description> Tag
Under every title tag you’ll find the meta description, which provides a brief summary of a web page. In the search engines, meta descriptions can often influence your site’s click-through rate.
The same concept can be applied when searching for your meta description. Use CTRL+F to type in “meta name=’ description content=”.

At the very least you should have these two particular meta tags on your site. You can add or update your title tag and meta description using Rankmath. You’ll find them in the “Title & Meta” menu.
Step 6: Check for H-tags
Although header tags (H-tags) aren’t as influential to your site rankings as they used to be, they still serve an important function. H- tags indirectly influence your rankings by making your content easier and more enjoyable for visitors to read.
It’s often considered good SEO practice to have at least one H1 tag that includes your keyword within it. But, with how competitive search ranking is nowadays, I’d suggest you go way beyond that. Your goal should be to optimize your pages as best as possible , without stuffing too many keywords.
This is yet another reason why I use Rankmath. It tells me how well my post and pages are utilizing header tags and the effect it has on my SEO.
To double check behind Rankmath, also look at your source code to see what header tags are rendered.
Remember, header tags provide structure and context for your website. Each header should give your readers (and Google crawlers) an idea of the information that’s included in your content.
Use these tags wisely and you should definitely see improvement in your SEO performance.
Step 7: Check for onsite content
Now, let’s shift gears from technical SEO solutions to more content-driven SEO.
Content SEO is the practice of creating content that helps your web pages rank high in the search engines. Because Google reads your website like anyone else, you must write and structure your content in such a way that gets it ranked in the search results.
For new websites, your first goal should be actually creating content. Without continual and sustainable content output, it’s hard to sustain good SEO or get website ranking.
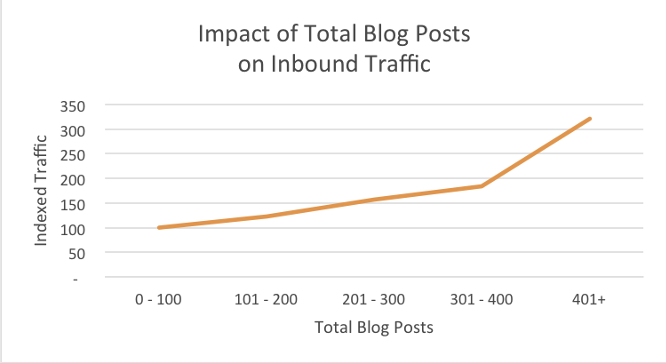
If you have yet to see a return on your SEO efforts, it’s likely due to the lack of content you currently have on your website. No need to fret. Keep putting out content over time to show Google your website is active and continuously being updated with fresh content.
To see whether your competitors have am ongoing content SEO strategy, search Google for “inurl:[competitors URL] Blog.”
It can be helpful to see what your competitors post about and how frequently they do so. If their articles are recent and consistent, this is a sign of a healthy blog, which means you got some work to do.
Step 8: Test keywords
The final way to improve your website ranking is by seeing how it fares for the current keywords it’s trying to rank for.
To do this, simply perform a search for your site’s targeted long-tail keywords.
For example, if I want to see how my website ranks for “fruitful income blog,” I’d type this in the results:
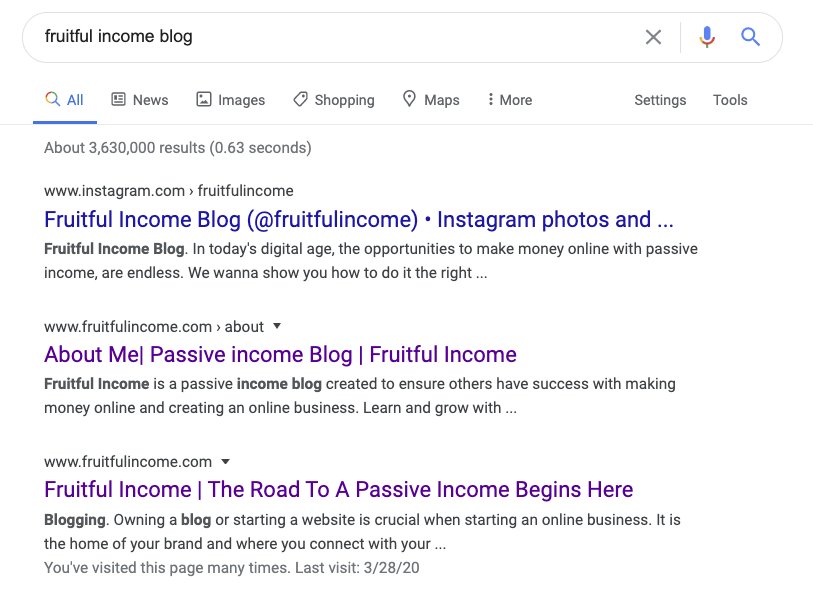
Ideally, you want your site to show on the front page for the keywords specific to it. If you aren’t on the top of the results for a particular keyword, then you still have more website optimization to do.
Test your target keywords as much as possible, preferably on a list of keywords that you or your competitors are targeting. Work through them one by one and see where you can improve. The seven previous steps might be a good place to start 🤔.
Conclusion
I hope this post gave you a better understanding of your website’s current SEO condition and the simple actions needed to quickly improve your site rank. Most of these steps are actionable and don’t require any special tools or expensive subscriptions.
Take a moment to implement these steps to see some improvement in your SEO. I recommend you take advantage of these strategies in your competitive research as well.
A little digging can tell you a lot about competitors in your niche, allowing you to see whether they are using proper SEO strategies. Pay attention to those sites within your niche that are ranked at the top of the SERP. They are there for a reason and, therefore, are worth analyzing.
With these 8 actionable steps, you should be ready to improve your SEO efforts and ,more specifically, your website ranking.
P.S If you are really serious about improving your site rank and don’t mind spending some money, I recommend you get the SEMRush tool. Although it’s known for being the best keyword research tool available, it’s much more than that. It’s an all-in-one internet marketing tool that has the potential to improve all aspects of your website. You can click below for a free 7-day trial.

